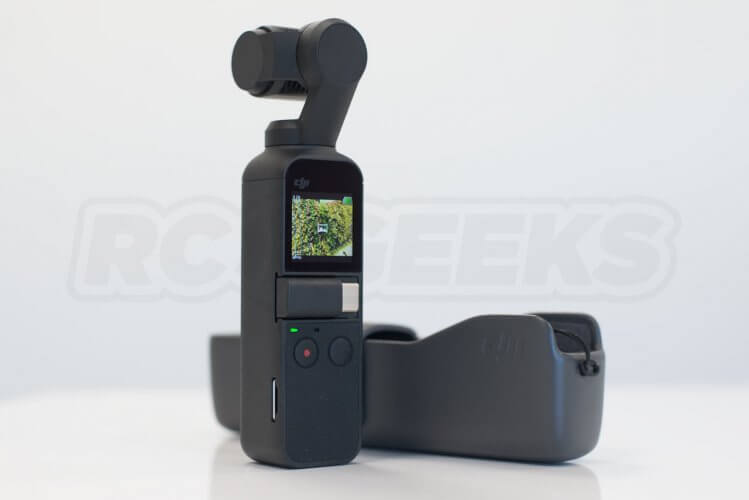
Designed to be used standalone or connected to your smartphone for fine adjustment, the Osmo Pocket is a 4k actively stabilised handheld camera aimed at travelers, vloggers, non-extreme action sports enthusiasts. The
Osmo Pocket completes the DJI Osmo range, filling in under the
Osmo+ and
Osmo mobile 2 handheld gimbals.
Osmo Pocket at a Glance
- Handheld 3-axis actively stabilised high-quality camera
-
4k Video @ 60fps, 120fps slow motion at 1080ps, 12MP Still photosp
-
140 Minute battery life with 73 minute charge time
- Small, sensitive touchscreen for reviewing media or adjusting shooting modes and settings
- Truly pocket sized at just 12 × 3.7 × 2.8 cm and just 116g
- Intelligent shooting modes with face tracking, hyperlapse and much more
- Compatible with lightning connector iPhones and USB-C connector Android devices
[gallery columns="2" size="medium" ids="https://cdn.shopify.com/s/files/1/0263/8469/5395/files/DJI-Osmo-Pocket-camera-forward.jpg|"]
Osmo Pocket Unboxing
DJI provide the Osmo Pocket in a plastic shrink wrapped cardboard container with card belt.
The box contents include:
- Osmo Pocket Camera
- Carry case
- Removable wrist strap
- USB-A to USB-C charging/data cable
-
USB-C Smartphone adapter
-
Lightning Smartphone adapter
[gallery columns="2" size="medium" ids="https://cdn.shopify.com/s/files/1/0263/8469/5395/files/DJI-Osmo-Pocket-connector-adaptors.jpg|"]
These phone adaptors slot into the device from the side and snap into place. Slide the universal port cover plate the Osmo Pocket comes with out to the left, then fit the one suitable for your phone onto the device. The adapter can be installed with the
tip facing inward (facing to the right) when not in use.
[gallery columns="4" size="medium" ids="https://cdn.shopify.com/s/files/1/0263/8469/5395/files/DJI-Osmo-Pocket-smartphone-connector-storage.jpg|"]
Just how small is the Osmo Pocket?
The Osmo Pocket really is
tiny, just 12.2cm tall, 3.7cm wide and 2.9cm deep. This device lives up to its title and really is
pocket-able.

Even with the included wrist strap and cover installed, it is shorter than most smartphones and easily fits in trouser pockets and clutch bags.
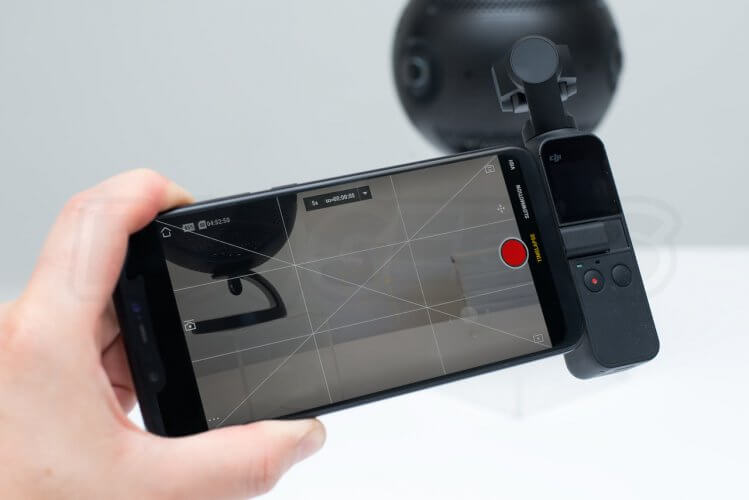
How do I activate my Osmo Pocket?
To active your Osmo Pocket you will need a compatible smartphone running
DJI Mimo with either a lightning port or USB-C port. If you are using an iPhone you will need to
install this iOS application from the iTunes store. If you are using an Android device you will need to
install this application from the Play Store.
- Install the correct adapter for your device with the plug facing outward
-
Power on the device with a long press on the round button on the right hand side of the body.
- Ensure your smartphone has internet access and plug the Osmo Pocket into it
- If the app does not auto launch, launch the DJI Mimo app
- The Osmo Pocket will confirm that it has connected to the device with an onscreen prompt and your smartphone will begin activation
- Tick the 'update device information' option on the app screen and hit next
- Tap login on the resulting popup and enter your DJI account details (or register for an account)
- Once logged in you can active via the large blue button at the bottom of the screen
The DJI Mimo a
pp has been available on the app stores since 13th December 2018, you can learn about it on the DJI site. DJI provide a video when the app starts to walk you through the process.
How long does it take to charge the Osmo Pocket?
Charging takes around
73 minutes from a 10W charger (not included) with the provided USB to USB-C cable. We would recommend
avoiding using high-output chargers designed for laptops and smartphones. Stick to using USB ports found on your laptop computer or powerbank. Note that the provided case has a hole in the bottom of it with a wide aperture, enabling you to charge

DJI claim the Osmo Pocket can shoot 1080p at 30fps continuous for
140 minutes. In real world usage turning it on and off between taking gthe odd clip or panorama you can get a days use out of it. The internal 875 mAh battery
cannot be removed but you can use plug a USB power pack into the bottom of the unit (pictured above) and
charge it whilst operating. When the device is charging the green led will blink.
Osmo Device Compatibility
We tested the Osmo Pocket connection to a
iPhone X,
Mi 8, and an
iPhone 8. The full list from DJI is as follows:
iOS: Requires iOS 10.0 or later.tim
Compatible with iPhone XS Max,iPhone XS,iPhone XR,iPhone X, iPhone 8 Plus, iPhone 8, iPhone 7 Plus, iPhone 7, iPhone 6s Plus, iPhone 6s, iPhone 6 Plus, iPhone 6, iPhone SE.
Android: Android version 5.0 or later.
Compatible with Huawei P20, Huawei P10, Huawei Mate 10 Pro, Huawei Mate 10, Huawei Mate 9 Pro, Huawei Mate 9, Honor 10, Honor 9, Vivo NEX, Mi Mix 2S,Mi 8, Mi 6, OnePlus 6T, OnePlus 5T,Google Pixel 2XL,Google Pixel 2.
You
can plug the Osmo Pocket into an iPad Mini, where the app will scale up to fit the larger screen.
Controlling the Osmo Pocket with the Touch Screen
The touchscreen is a
tiny 20 x 18mm but has a relatively high DPI, thus the image looks sharp. There is some banding suggesting either a compressed preview feed or limited colour palette for the display. It has three brightness settings but isn't as bright as modern smartphones. An
aspect ratio of nearly 1:1 means that in standard display mode the preview will crop the edges from what is actually being recorded. The main settings menu allows you to
letterbox the display to avoid this, showing you what is actually being captured, but it does then make it difficult to see the subject clearly.
 Pro Tip
: To exit the menu screen you are on, look for the little white bar at the edge of the screen, place your finger there and swipe to the alternate edge. So for the settings menu 'push up' after pulling down.
Below you can see the letterbox display and brightness option settings as well as the deeper settings submenu.
[video width="640" height="360" webm="https://cdn.shopify.com/s/files/1/0263/8469/5395/files/osmo-pocket-settings.webm"][/video]
When in normal
live view mode, sliding your thumb up and down on the
edge of the touchscreen will tilt the gimbal up and down. This control can be switched to operate the horizontal rotation or 'pan' of the gimbal by accessing the tilt control option on the settings menu (note that you still slide your finger up and down, not left to right as would be intuitive).
[video width="640" height="360" webm="https://cdn.shopify.com/s/files/1/0263/8469/5395/files/osmo-pocket-camera-tilt.webm"][/video]
At first we were
a little overwhelmed by the different gesture variations you need to remember to operate the camera, but after a few days of usage it becomes second nature.
To gimbal operation mode, swipe up on the screen to switch between them; These modes are:
-
Tilt locked : Fixes the camera to that position on the tilt axis no matter how you move the body of the camera.
-
Follow : Will soften movements but follow the direction of the camera body in tilt and rotate.
-
FPV : Similar to follow mode but allows the gimbal to roll left and right for an 'immersive' feel.

This menu also allows you to flip the camera (top right option) into
selfie mode, but we felt it easier to triple tap the right-hand button instead. You can
change the speed at which the gimbal will follow under the gimbal setting, with
fast or
slow speeds available.
Should the horizon level go awry, you can
re-calibrate the gimbal via the calibration option on the settings screen (accessed by swiping down from the main menu) and following the instructions to place the device on a flat surface and not to touch it. You can also access gimbal auto calibration by tapping the icon in the lower left corner of the screen in the DJI Mimo app.
Osmo Pocket Buttons
As mentioned to power up the Osmo Pocket you 'long press' the
right (blank) button for a second or so. When powered up this button also switches between shooting modes. Long pressing it again powers down the device with the gimbal rotating the camera to a vertical plane and to the right, perfectly orientating it for it to be placed
back into its case as seen below.

Short-pressing it
switches between photo and video with a confirmation beep.
Double-tapping this button will
recentre the gimbal with the horizon (or vertical, if holding thee gimbal sideways).
Triple tapping will flip the camera direction between forward and backward 'selfie' mode (As pictured above). When pointing backwards over the screen,
face tracking is automatically enabled in both photo and video modes.

The
left button with the red dimple is for
recording. In video mode it
starts and stops the filming as you would expect. When in photo mode it
activates the shutter (note there is no 'half-press' for focus, this must be set by touching the screen). You cannot hold the button down for 'burst' shots and need to tap it for every photo taken.
If you are wanting more physical controls, take a look at the '
control wheel' in the accessories section further down.
Switching operation modes
The Osmo Pocket's flexible operation modes are its killer feature, allowing you to get a stabilised camera into some really tight spaces.
Flashlight
Entering
Flashlight mode is just a case of locking the gimbal and rotating the handle up so that the camera faces straight off the edge. It will automatically lock into this mode until you swing the handle back down to the standard 90° vertical position. Alternatively you can tilt the camera until it faces straight ahead (from the handle), swipe up on the screen and click the 'recentre' option to enter Flashlight mode, exiting just a reversal of this procedure.
[gallery columns="2" size="medium" ids="https://cdn.shopify.com/s/files/1/0263/8469/5395/files/DJI-Osmo-Pocket-press-record.jpg|"]
Portrait and Underslung
Rotating the unit so it is upside down will swap it into
underslung mode for those
low low shots. The live feed will automatically rotate to help you compose your shot without confusion, but note that the UI will remain upside down.
Rotating the unit so it is on it side will enter
portrait mode, ideal for creating video for Instagram stories. Note that you can't go into Portrait into FPV mode, presumably due to limitations in the gimbals movement.
Filming with the Osmo Pocket
The Osmo Pocket can film up to 4k resolutions (3840 x 2160) and supports both MOV and MP4 recording formats. To switch between 4K and 1080p resolution
swipe left across the video modes screen to enter video settings, naturally this can also be changed in the Mimo app.
When filming or taking photos, the on-screen-display displays the video duration or photo
capacity remaining on the memory card. you can also check the remaining capacity under the settings menu.
Enabling the superfine video setting when using the Mimo app in 'pro' mode allows the camera to crank the video bitrate to 100Mbit for
better quality video.
Stabilised Video
As to be expected from any DJI product, the gimbal makes a fantastic job of stabilising the footage. Below is a short clip taken (originally in 4k/30 in fpv mode) from a road bike on a bumpy cycle lane. The image quality is solid with good exposure and focus, although some shutter roll is evident.
[video width="1280" height="720" webm="https://cdn.shopify.com/s/files/1/0263/8469/5395/files/osmo-pocket-fpv-bikelanes.webm"][/video]
Face tracking
Activate facetrack by entering selfie mode (triple tap the right hand button) or double tap the subject when using the DJI Mimo app. This mode will be
favoured by vloggers who longer have to worry about angling their camera to maintain framing and focus. Its really impressive that this little unit has enough processing power for real-time video analysis, allowing it to keep a face in frame.
Slow motion
Slow motion filming is recorded at 1080p/120 and lavelled as '4x' in the menus. Filming things in slow motion with a gimbal always gives great results and the osmo pocket is no exception.
[video width="640" height="360" webm="https://cdn.shopify.com/s/files/1/0263/8469/5395/files/osmo-pocket-slowmo.webm"][/video]
Timelapse
This was a favourite feature for us on the Osmo Mobile and we are glad it has been retained on the pocket. You can get some fantastic hyperlapses with the gimbal smoothing things out.

Intervals between the shots can be adjusted and a gimbal path can even be set for a panning timelapse. Please excuse our uninspiring example!
[video width="1280" height="720" webm="https://cdn.shopify.com/s/files/1/0263/8469/5395/files/osmo-pocket-timelapse.webm"][/video]
As with video mode you swipe right on the screen to enter playback mode to review your shots. The tiny screen isn't really suited for reviewing so we'd recommend you connect your smartphone to the device, or better still insert the memory card into your computer for reviewing media. We tried uploading MOV files taken on our Nikon D800 onto the internal memory but it did not play them back.
[video width="640" height="360" webm="https://cdn.shopify.com/s/files/1/0263/8469/5395/files/osmo-pocket-replay.webm"][/video]
Pocket Osmo Audio Quality
DJI claim the device has two microphones and that they '
adopt a noise-reduction algorithm, greatly improving Osmo Pocket’s recording quality'. From our testing, we feel that the audio quality is a
weak area for the camera. Many vloggers online agree with us, opting to pair the Osmo Pocket with a basic lav mic/sound recorder (using the standard audio recording for syncing purposes) for best results.

Its worth noting that DJI will be offering a USB-C to 3.5mm adapter in the future for attaching an external mic via the base port. We tried a Xiaomi Mi 8 USB-C to 3.5mm headphone adapter in the base of the device but found that it
would not accept a mic input through these.
Taking photos with the Osmo Pocket
Still shooting
The Osmo Pocket takes images up to 4000x3000px in size, has a max ISO sensitivity of 3200 and a max shutter speed of 1/8000s. On the front of the camera is an 80° FOV F2.0 (max aperture) lens with focal length of 26mm (35mm equiv).
Photo ratio can be adjusted between 16:9 as standard, 4:3 and 3:2 formats. The Osmo Pocket also has a
self timer with 3, 5 or 7 second delay. In countdown mode the touchscreen will display an animated countdown of numbers and take the shot at the end of the series. Low light performance is admirable in a sensor this small although we felt the images themselves were a little over-sharpened like some of the older drones.

Panoramic shooting
The Osmo Pocket has a couple of panoramic shooting modes. Note that you cannot view stitched panoramas without connecting to the DJI Mimo app, as some of the processing needs to be handled by your smart device.
In
180° panorama mode it will automatically yaw the gimbal around, taking 4 photos which are then stitched in the app. The results are nice with great exposure control and minimal stitching errors. Below we have taken a standard photo and then a 180° panorama on the same spot:
[gallery columns="1" size="medium" ids="https://cdn.shopify.com/s/files/1/0263/8469/5395/files/pano_180_6553653_1546177694000.jpg|"]
Its
3x3 panorama mode allows you to take a wider shot where you are unable to step back from the subject. When you hit the shutter button it will twist the camera around to take 9 photos that are then stitched together in the app. The images stored do not appear to offer the 'super resolution' size that the Mavic 2 Zoom's similar mode creates, however the
original shots are stored on the memory card which would allow you to stitch them together using third party software to achieve a high-resolution image. We took a standard photo and a 3x3 panorama from the same spot to show the results:
[gallery size="medium" columns="2" ids="https://cdn.shopify.com/s/files/1/0263/8469/5395/files/pano_3x3_6553648_1546176058000.jpg|"]
The images it products do have a 'punched' lens barrel distortion look to them but in the right light they show good colour production and detail. DJI's algorithms for sewing together images just keep getting better. Regardless of which panorma mode you use, whenever shooting with your phone attached,
keep your fingers well away from the edges or you may find them in shot! Finally,
yes you can take panoramas in selfie mode.
Memory cards for the Osmo Pocket
The camera has a MicroSD card slot but no memory card is included in the box. DJI recommend using a card with a write speed over 15MB/s so we opted for a a UHS-1 rated card to ensure performance and to avoid any bottlenecks.

We used a Lexar 16GB UHS-1 card for our review and also tested the device with various Sandisk cards. The maximum card size the camera will currently take is
256GB. When in its slip case, the card port is on the open side, allowing you to remove it without taking it out of the case, a nice touch.
Reviewing your Osmo Pocket footage
For the majority we predict they will just plug the Osmo Pocket into the bottom of their smartphone and review the photos and video on the DJI Mimo app. We'd recommend removing the card and placing it into a memory card reader for the fastest transmission speeds.
If you do not have a Micro-SD card reader to hand, you can still access the contents by
plugging the Pocket Osmo into your machine with the included USB-C cable.

Once the device is connected and powered up it will prompt you with the message 'Connect to computer?'. Hit '
Accept' and the device will appear as an external drive on your computer. The Osmo Pocket gimbal
will go limp when connected to the computer, and it will also charge whilst in this mode.
Is the Osmo Pocket Waterproof? Does it have an IP rating?
As shipped, the Osmo Pocket is
not dust or waterproof. This will be a
deal-breaker for a lot of people hoping to
replace their GoPro with this. DJI do offer a slightly clumsy waterproof housing designed for shallow diving, but this is overkill for many customers who would have liked (or maybe even
assumed) it to have a IP 67 (dust and water jet protection) rating out of the box.
DJI Mimo App
The Mimo app is billed to 'unlock' your Osmo Pocket's potential. In reality it is a required part of the package from the initial activation to processing panoramas as previously mentioned.
Unlocking Pro modes
With the device connected to the phone, press the bottom right 'dots' option to load up the extended options menu and press the PRO at the top. Note that the Osmo Pocket screen will go blank with the smartphone in use.

Here you can enable useful things like grid and diagonal lines that will help compsition, tweak white balance and add '
overexposure tip' to show when the image is blown out (as shown below).

You can also turn on the histogram and the iso/shutter/aperture indicators to keep track of your settings. It also enables you to shoot at 24 or 25 frames per second, something you cannot access from the standard pocket menu.

The finer controls allowed us to get shots in more challenging situations but we were not a fan of having to hang the device out of our phone ports to do so. A
wireless base would be a smart choice if you intend to use the Mimo application heavily.
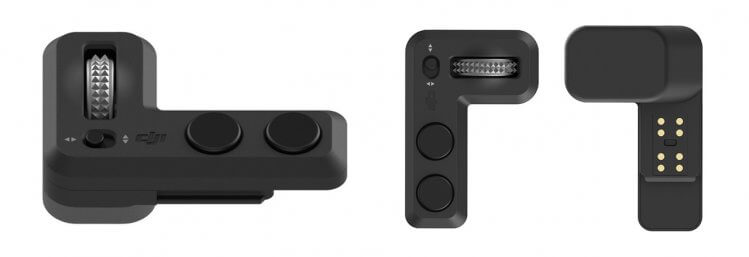
DJI Osmo Accessories
DJI have launched the Osmo Pocket with three core accessories but have six or more planned down the line. TLDR? The wireless base and the controller wheel (in our opinon) currently the
must have add-ons. They allow you to position or mount the camera creatively whilst allowing for full wireless control and playback.
Osmo Pocket Controller Wheel
Fitting this requires you to remove your phone adapter, slotting it onto the face of the device. For £53 it adds a
switchable jog-dial and
two extra buttons to the input options of the gimbal.
This is a great addition to the camera, allowing you to
tilt and pan the camera one handed (by just rolling the wheel and flicking the toggle with your thumb, rather than faffing with the touchscreen) whilst the additional buttons allow you to re-centre the gimbal or switch shooting modes with ease. This little gadget makes the Osmo Pocket
so much simpler to use for an imperceptible 9.7g additional 'weight penalty' and we wish it came bundled as standard.
Osmo Pocket Wireless Module
The wireless module is £53 stand/wireless interface. When plugged in, you can wireless-ly connect to the Osmo from the Mimo app on your smartphone and start recording, change settings etc. It has a pass-through USB-C port that allows you to charge the Osmo Pocket whilst using it.

Excuse a short rant, but our main bug-bear with the Osmo Pocket is the
lack of wireless control as standard. Having the £330 camera hang out the side of our £500 smartphone, supported only by the USB-C port is not a great feeling and we are concerned that it is only a
matter of time till someone damages their port because of the strain on it. We understand that it is impossible to design a mount that would fit and support all the different phone designs, but why not just provide the device with bluetooth
as standard?
Osmo Pocket Accessory Mount
At just £23 this is the cheapest accessory at launch, but arguably one that
should have been bundled as standard. Positioned around the centre-of-gravity, the accessory mount clamps around the handle framing the control buttons.

The inclusion of the GoPro compatible twin-prong mount is a welcome move, opening the Osmo Pocket to a world of mounting potential. Multipacks of GoPro clone mounts can be purchased cheaply online, so we expect to see Osmo Pocket cameras mounted in some extreme locations where the gimbal will allow it to shine.
Accessories to Follow
DJI has promised several extra accessories will be released in 2019. A
waterproof housing that can protect the camera down to 60m underwater will be popular with snorkelers looking to explore the reef. Travellers will also be interested in the
charging case, which has space to house the camera, two microSD cards, four ND filters, two smartphone connectors. It is designed to charge the camera on the move, with a slot to slide the camera into.
[gallery columns="4" link="file" ids="https://cdn.shopify.com/s/files/1/0263/8469/5395/files/dji-osmo-pocket_extension-rod.jpg|"]
Besides that, DJI will be providing a USB-C to 3.5mm
mic adapter for plugging in external microphones. A set of
neutral density filters to cover 4/8/16/32 values for filming in bright environments will be available. Lastly an
extension rod will be released for those long range selfie-stick lovers, providing duplicate operation buttons on its handle.
Mounting the Osmo Pocket
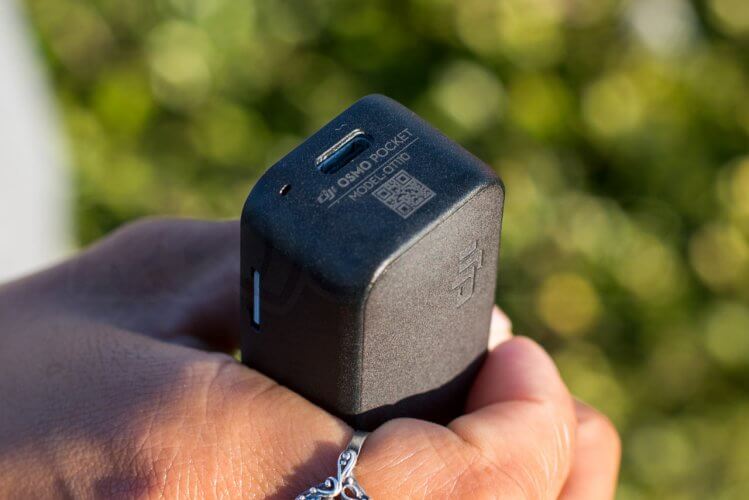
DJI opted to fit just a USB-C connector in the base of the device which is a great shame. We would have liked to have seen a standard 1/4in female tripod thread included. The sceptics in the office believe this was an intentional move to funnel users into buying
potentially expensive accessories to achieve mounting, but it could have just been a manufacturing decision made to save precious space.
Instead you will need to purchase the
Extension Rod accessory which has a tripod thread in its base, or opt for the
Accessory mount that has a GoPro style pronged mount that could be adapted for tripod use. If you just wanted to stand the Osmo Pocket up you could purchase the
Wireless Module and use that as a flat base with the camera is held in by light friction and the presence of the USB-C connector.

What would I use an Osmo Pocket for?
We were initially sceptical. Plenty of people buying it for the sake of it. Here is a list of possibilities
-
Backpackers : who will appreciate its size and capabilities
-
Social Media Addicts/Influencers : Looking to improve their posts without carrying £££ of camera gear
-
Vloggers : making the most of the face tracking and active stabilisation on the move
-
Action sports videographers : happy to put the osmo pocket in harms' way for a killer stabilised shot
-
Freerunners : looking for a compact but high stablised quality camera that could be head-mounted
-
Hobbyists : looking to mount a camera to an RC Car or plane but retain stabilisation

Should I buy an Osmo Pocket?
With its launch price of £330 it is at the higher end for handheld cameras, but its 3-axis gimbal products video a cut above the rest. We feel that the comparisons with the GoPro Hero 7 are unfounded as this is very much a
different tool for an alternative customer base. If you are a parent with young kids, a Youtube vlogger or do a lot of backpacking
you will love the Osmo Pocket.
We love
- The tiny, truly pocket sized form factor
- Simple and reliable to operate
- Incredible processing power, allowing for intelligent filming such as face tracking
-
High-quality, sharp 4K video
-
Robust, quality yet lightweight camera
We don't like
- You cannot connect to the Pocket Osmo wirelessly without the base adapter. This can be frustrating if you want to review footage or photos when the camera is mounted to something and you can't plug your phone in.
- It relies heavily on swipe gestures for flipping between screens and settings. This arguably isn't as intuitive for new users who are more likely to expect to tap the screen.
- No official dust/moisture protection means you will need to be careful with it out and about in a world where IP ratings are seemingly everywhere.
If you are a content creator we'd recommend you pickup the
Osmo Pocket expansion kit. It includes the Accessory Mount, Wireless Module a 32GB Samsung microSD Card and the Controller Wheel for finer control.
[gallery columns="2" size="medium" ids="https://cdn.shopify.com/s/files/1/0263/8469/5395/files/DJI-Osmo-Pocket-camera-back.jpg|"]
RC Geeks : Gimbal Geeks
You can buy the
DJI Osmo Pocket on our webstore here. Keep an eye on our site as we will shortly be listing the accessories too.
If you already have a cutting-edge smartphone such as an iPhone X, or you have a phone that still uses a USB-mini port, consider picking up the cheaper
Osmo Mobile 2 instead. Whilst larger and more fiddly to setup and adjust, it is substantially cheaper and can offer fantastic results.
Why not take a look at our other
camera stabilisation products on our webstore, such as the fantastic
DJI Ronin S.
 EXCELLENT 4.4+ OUT OF 5