
Order your Traxxas TRX-4 Light Kit Today Yes our favourite RC Car of 2017 is back! Traxxas have been busy at work, releasing many modifications for the Land Rover Defender bodied TRX-4. In our latest modification blog, we have decided to fit the LED Light Kit to allow us to crawl our way out of these dark winters nights. You can buy the setup in various component kits so if you just wanted the head/tail-lights and say the roof mounted light-bar you could make that happen. For the purposes of this article we will be installing the full LED light kit which can be purchased from our webstore here.
 Included inside were:
 Taking a (quality) 1.5mm hex bit and our electric screwdriver, we sat about removing the 20 or so 1.5mm cap bolts that hold on the wheel arches.
  This is a laborious task that will take some time manually. Note that several of the cap bolts on the arches are actually cosmetic fakes, so don't panic thinking you have rounded something out if it isn't coming undone. Next take a 2mm hex driver and undo the two long bolts that hold the rear arch liner module to the tailgate piece.
 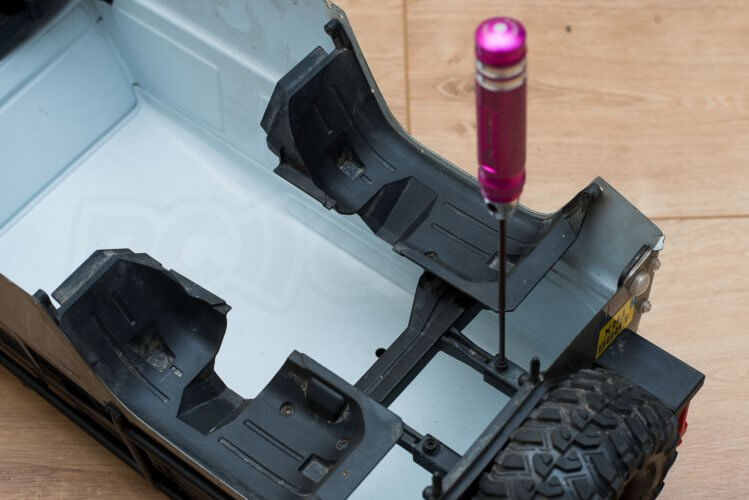 The front arch-liners will already be lose in the body as they are only held on by the arch extension fixings and thus it can all be removed from the shell as shown below.
  With those out of the way, we can start removing the blanking plates for the lights. The front ones are held in with three 2mm hex bolts, then you just need to prod the plastic lens out over the three stand-mounts. Avoid using power tools to loosen these screws, you will strip the heads (ask us how we know). [gallery size="medium" link="file" ids="https://cdn.shopify.com/s/files/1/0263/8469/5395/files/Traxxas-TRX-4-Light-kit-installation-remove-headlight-lenses.jpg|"] The rears are held on with just one 2mm hex bolt, sadly both of ours were very, very stiff. We managed to lubricate the back of one of the bolts through the rear of the plastic mount but despite attempts at using heat, the other bolt had to be cut out(!).
  When you are finished you should be left with the blanks, original lenses and eight 2mm screws.
We gave the interior of the shell a quick spray with some all-purpose cleaner and wiped it down before moving on.
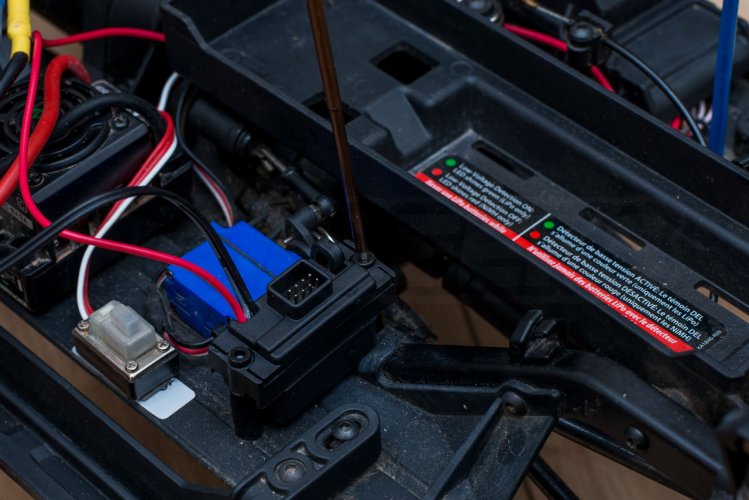
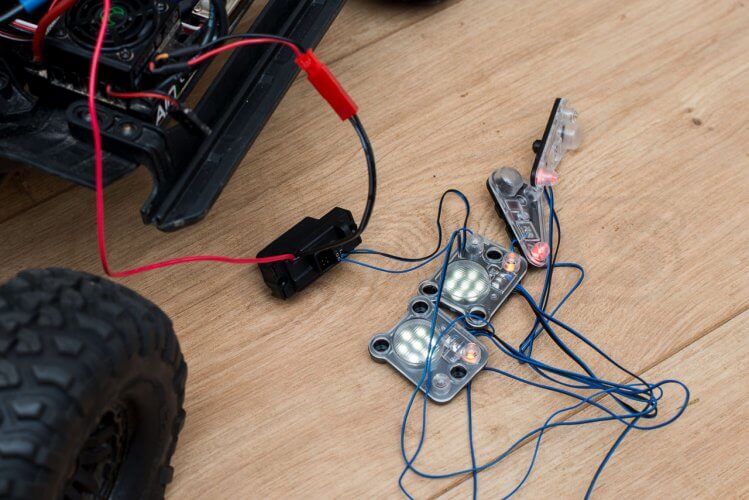 However, if like us you have removed the standard power system in favour of a third-party brushless setup, its unlikely that your ESC will have this output to power the LED module. Instead we made a small lead out of some spares, using the fan output from our ESC just to test the system out.
  From our research, the stock Traxxas XL5 HV ESC output is a live-lead providing battery-level output whenever turned on and is reportedly rated up to 3S. We shall look to build a lead that runs the kit from the BEC or even just the balance lead of the battery in the future.
 These attach with the three 2mm bolts you removed earlier. Untangle the wires and spread them around the body as you work from light to light to make it easier to tie them down later.
 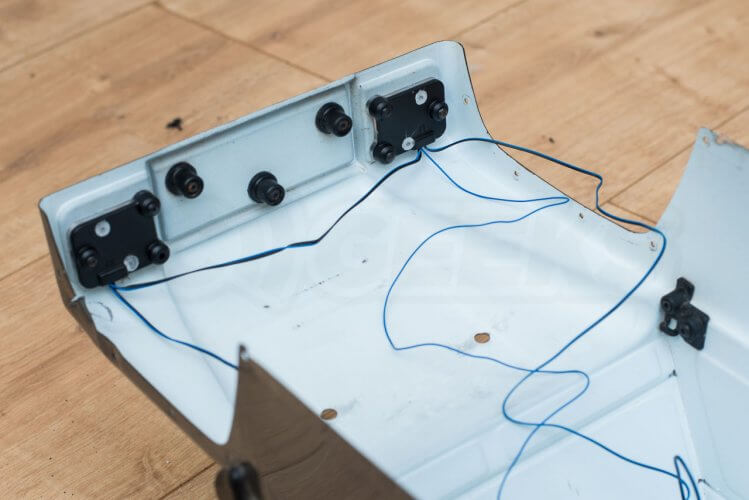 Work your way around the bodyshell fitting the modules at the rear, screwing from outside of the body.
 Next we took a 2mm hex driver and removed the two blanking plates from each arch liner as shown below.
  Before replacing them with the rock lights and screwing them back down.
  You can now replace these liners back into the shell, making sure to fit the long 2mm bolts to connect the rear liners to the shell mounting point. Take your time and enjoy screwing in what feels like one-hundred 1.5mm cap screws to re-attach the arch extensions.
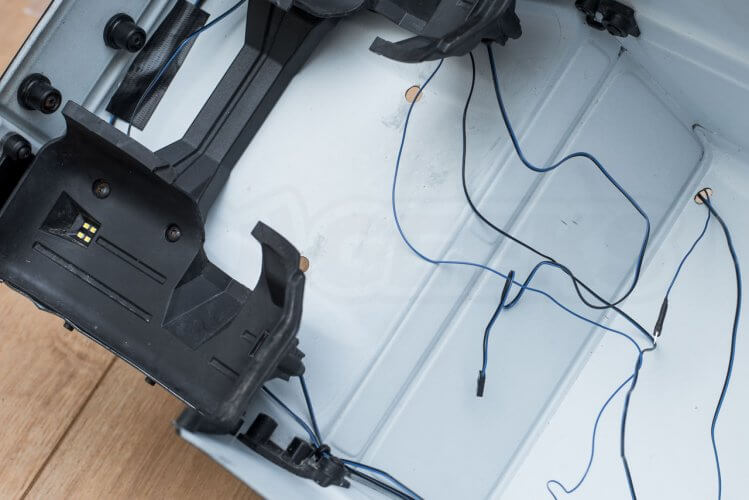
 This mounts above the windscreen to the front over-body cage, so you will need to make a hole in the body to run the power cable back inside.
  Traxxas recommend using a body reamer but we only had our Dremel on hand to drill a slot. It only needs to be big enough to fit a servo cable header through, so a small slot could be hidden under the cage if created with care.
  Then using two new 2.5x6mm cap screws (supplied in the kit) secure it to inner marked holes on the leading edge of the cage
 The LED lighting module has four outputs on it but the kit includes a 3-in-1 wiring harness to simplify some of the wiring between the body and the chassis. We connected the rock-lights, headlights and taillights up to this. Now is the time to use the included cable ties to gather the cables and minimise any lose ends hanging down that could interfere with the drivetrain.
  With the wiring somewhat tidied up, we connected the wiring harness to the LED lighting module and turned the ESC power switch on for one final test. Confirming that all the components had lit up, we refitted the body to admire our work!
 At the front you have the 7-LED headlights, single bulb orange 'running lights' (its an american-made kit, I guess you could rewire them to use them as Land Rover designed, as indicators) and the light bar.
  Whilst at the rear you have just the two red running lights, sadly they don't get any brighter when you hit the brakes.
  Underneath the chassis you have the rock lights that shine down onto and around the tyres.
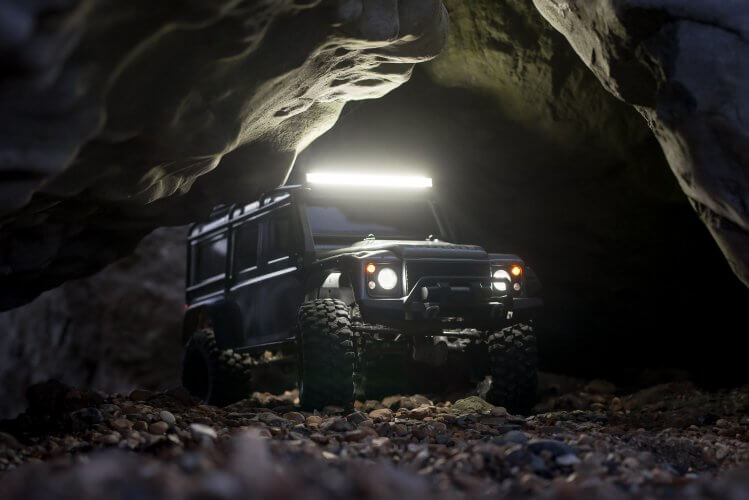
  We'd assumed this upgrade was purely aesthetic, but the LED system is actually usable, making it easier to see what the truck is stuck on whilst climbing!
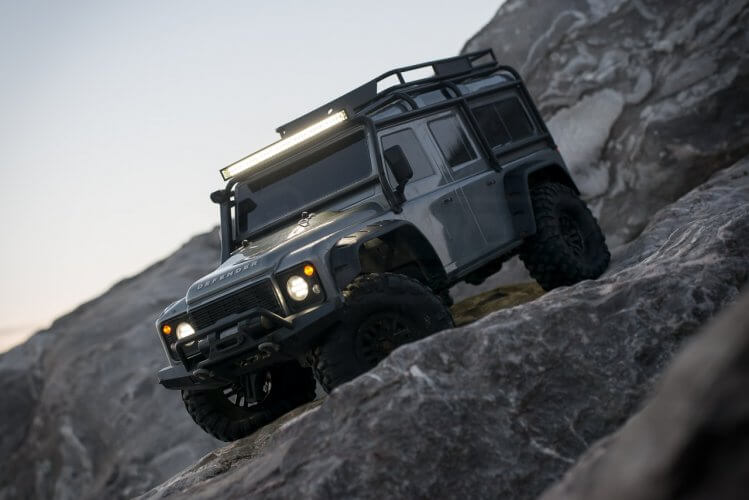
  When the sun is setting the light bar does a great job of highlighting the area infront of the vehicle.
  Its definitely time to re-fit our FPV setup to see how it copes in low-light!
 And now looking at the difference from behind the truck, as you'd see it whilst crawling.
  Its a nice little touch that could prove useful in certain situations.
 It is clear (from details such as the wheel well mounting points) that this truck was designed with this lighting kit from the start. With such attention to detail we would have preferred a centralised quick-release connector, allowing easier unplugging of the lighting kit from the chassis, since you need to lift the lid to swap out the car battery. Less important but also nice-to-have, would be the ability to turn the lights on and off remotely from the 'set' button on the standard transmitter. The full kit we used in this article is available on our webstore here. If you are looking to purchase individual extras such as the lightbar, drop us a message and we will endeavour to help out. If you have any questions about installation, drop us a comment below.
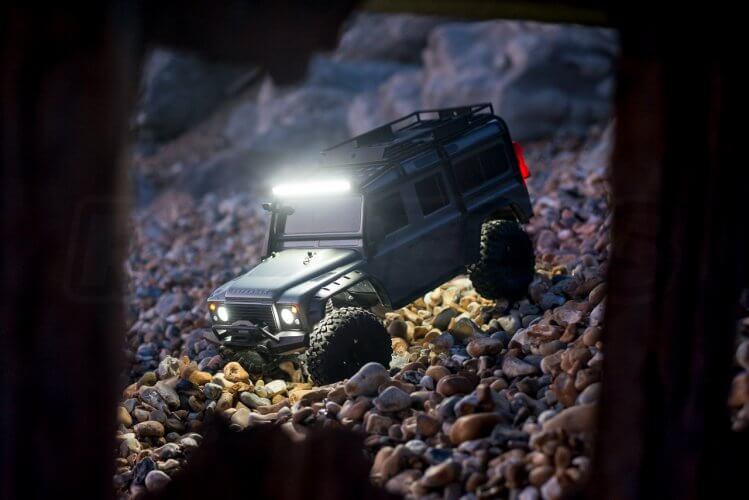
What does it come with?
Our kit (Traxxas Part number 8030) came in a plastic parts bag with card header Included inside were:
- A very cool looking Rigid-branded LED light bar
- The rad LED headlight/tail light harness assembly
- LED rock light harness assembly
- LED lighting module
- 3-in-1 wire harness
- Two 2.5x15mm cap screws
- Twp 2.5x6mm cap screws
- Nine small black cable ties
- Instruction sheet (also available online) that you should probably read before you start
Fitting the Traxxas LED Light Kit
As with our other guides, we take no responsibility for any potentially warranty-invalidating work carried out on your model by yourself, it is at your own risk. With the disclaimer out of the way, lets get down to it.Tools required
To fit the kit to the TRX-4 you will need the following tools:- 1.5mm hex driver
- 2.0mm hex driver
- 2.5mm hex driver
- Knife/scissors for cutting cable ties
- Body reamer/small drill for making a hole in the shell
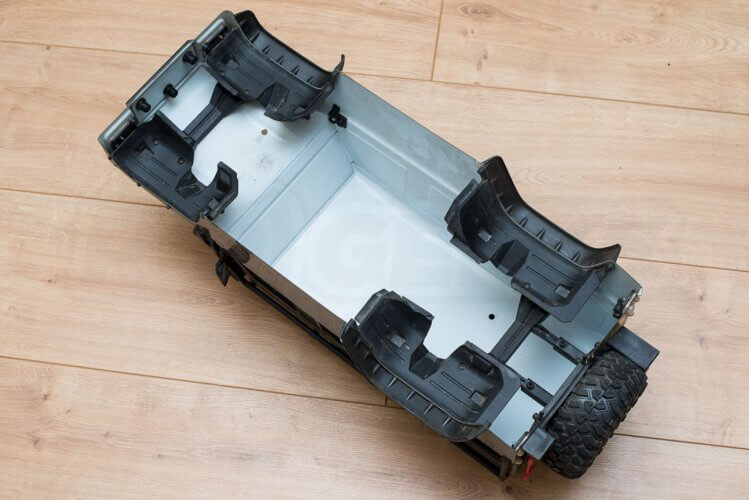
Preparing the shell
We started by removing the body from the model. With it belly-up you get access to the outer and inner arches, as well as the light buckets. Taking a (quality) 1.5mm hex bit and our electric screwdriver, we sat about removing the 20 or so 1.5mm cap bolts that hold on the wheel arches. This is a laborious task that will take some time manually. Note that several of the cap bolts on the arches are actually cosmetic fakes, so don't panic thinking you have rounded something out if it isn't coming undone. Next take a 2mm hex driver and undo the two long bolts that hold the rear arch liner module to the tailgate piece. The front arch-liners will already be lose in the body as they are only held on by the arch extension fixings and thus it can all be removed from the shell as shown below. With those out of the way, we can start removing the blanking plates for the lights. The front ones are held in with three 2mm hex bolts, then you just need to prod the plastic lens out over the three stand-mounts. Avoid using power tools to loosen these screws, you will strip the heads (ask us how we know). [gallery size="medium" link="file" ids="https://cdn.shopify.com/s/files/1/0263/8469/5395/files/Traxxas-TRX-4-Light-kit-installation-remove-headlight-lenses.jpg|"] The rears are held on with just one 2mm hex bolt, sadly both of ours were very, very stiff. We managed to lubricate the back of one of the bolts through the rear of the plastic mount but despite attempts at using heat, the other bolt had to be cut out(!). When you are finished you should be left with the blanks, original lenses and eight 2mm screws.

Testing the setup - Powering the kit
Before committing the kit to the car its always a good idea to give it a test run. You need to pop the receiver box lid off (three 2mm hex bolts) and plug the red wire coming out of the newly included LED lighting module into Ch1 on the receiver. You also need to connect the red male JST plug on the standard ESC to the connector on the LED lighting module as shown below. [gallery columns="2" size="medium" link="file" ids="https://cdn.shopify.com/s/files/1/0263/8469/5395/files/Traxxas-TRX-4-Light-kit-installation-lighting-module-standard-esc.jpg|"] Then you can plug in the led looms into the module, fire up the car and the lights should turn on like this: However, if like us you have removed the standard power system in favour of a third-party brushless setup, its unlikely that your ESC will have this output to power the LED module. Instead we made a small lead out of some spares, using the fan output from our ESC just to test the system out. From our research, the stock Traxxas XL5 HV ESC output is a live-lead providing battery-level output whenever turned on and is reportedly rated up to 3S. We shall look to build a lead that runs the kit from the BEC or even just the balance lead of the battery in the future.
Fitting the body lights
Safe in the knowledge that the system works, we set about fitting it to the car. Each of the light units has a mark on the back to explain where in the bodyshell they fit, for instance this one pictured below is the right-front light unit. These attach with the three 2mm bolts you removed earlier. Untangle the wires and spread them around the body as you work from light to light to make it easier to tie them down later. Work your way around the bodyshell fitting the modules at the rear, screwing from outside of the body.
Fitting the rock-lights
Whilst not personally a fan, these lights are fitted in the arch liners, positioned to 'help illuminate obstacles for trouble-free nighttime crawling'. Before starting we scrubbed the tops of the arch liners with all-purpose cleaner since we rarely get a chance to reach them.Next we took a 2mm hex driver and removed the two blanking plates from each arch liner as shown below. Before replacing them with the rock lights and screwing them back down. You can now replace these liners back into the shell, making sure to fit the long 2mm bolts to connect the rear liners to the shell mounting point. Take your time and enjoy screwing in what feels like one-hundred 1.5mm cap screws to re-attach the arch extensions.
Fitting the light-bar
Probably our favourite component in the set is the adjustable (angle and brightness) Rigid Industries branded light-bar. This mounts above the windscreen to the front over-body cage, so you will need to make a hole in the body to run the power cable back inside. Traxxas recommend using a body reamer but we only had our Dremel on hand to drill a slot. It only needs to be big enough to fit a servo cable header through, so a small slot could be hidden under the cage if created with care. Then using two new 2.5x6mm cap screws (supplied in the kit) secure it to inner marked holes on the leading edge of the cage
Finishing the LED Light kit installation
Taking the 2.5x15mm cap screws, affix the LED lighting module to the posts behind the ESC. Run the red wire alongside the ESC to Receiver wire, under the battery tray, between the two diff servos and into the receiver box. Connect it to channel 1 on the receiver as previously mentioned. Hook up the JST connector to the ESC for power. The LED lighting module has four outputs on it but the kit includes a 3-in-1 wiring harness to simplify some of the wiring between the body and the chassis. We connected the rock-lights, headlights and taillights up to this. Now is the time to use the included cable ties to gather the cables and minimise any lose ends hanging down that could interfere with the drivetrain. With the wiring somewhat tidied up, we connected the wiring harness to the LED lighting module and turned the ESC power switch on for one final test. Confirming that all the components had lit up, we refitted the body to admire our work!
Traxxas LED Light Kit in use
As mentioned before the light kit turns on with the car power, so after connecting the battery and fiddling with putting the shell back on you are good to go. At the front you have the 7-LED headlights, single bulb orange 'running lights' (its an american-made kit, I guess you could rewire them to use them as Land Rover designed, as indicators) and the light bar. Whilst at the rear you have just the two red running lights, sadly they don't get any brighter when you hit the brakes. Underneath the chassis you have the rock lights that shine down onto and around the tyres. We'd assumed this upgrade was purely aesthetic, but the LED system is actually usable, making it easier to see what the truck is stuck on whilst climbing! When the sun is setting the light bar does a great job of highlighting the area infront of the vehicle. Its definitely time to re-fit our FPV setup to see how it copes in low-light!
LED Light Bar Brightness
On the back of the light bar is a switch that alters how bright the lightbar is. Below are two animated gifs made from photos taken with a fixed exposure to give you an idea of the difference in output. First looking directly at the truck And now looking at the difference from behind the truck, as you'd see it whilst crawling. Its a nice little touch that could prove useful in certain situations.
Should I buy this LED light kit?
Yes its expensive, but yes it is quality and yes its very cool. This pretty much sums up the entire purchase/ownership experience of Traxxas products, you will get a quality, well finished model but at a price. We like that (assuming your model is stock) it includes everything you need (bar a shell cutting tool) to install it to the model. It is clear (from details such as the wheel well mounting points) that this truck was designed with this lighting kit from the start. With such attention to detail we would have preferred a centralised quick-release connector, allowing easier unplugging of the lighting kit from the chassis, since you need to lift the lid to swap out the car battery. Less important but also nice-to-have, would be the ability to turn the lights on and off remotely from the 'set' button on the standard transmitter. The full kit we used in this article is available on our webstore here. If you are looking to purchase individual extras such as the lightbar, drop us a message and we will endeavour to help out. If you have any questions about installation, drop us a comment below.


