 EXCELLENT 4.4+ OUT OF 5
Reviews
Funtek Raid Adventure : A low-cost, Land Rover style RC car
Having spent the past couple of years reviewing RTR models (aka the ‘dark side’ of RC cars) we felt it was high time that we had a crack at building one up from a kit. Marking the 5 year anniversary of our 3Racing F113 build, we are back with 3Racing‘s most recent open-wheeled racing chassis, the FGX2018. Join us as we play motorsport-engineers for-a-day, piecing this F1 racer together!
Included in the box are 9 bags of components, the pre-finished body, printed instructions and two sticker sheets.


Beyond this release 3Racing are in the process of phasing out their printed instructions in an admirable attempt to reduce waste (although critics in the office suggested it was just to save money). Thankfully the manual is also available on their website, as is their setup sheet.
We also recommend grabbing a small file, some tweezers, a steel ruler (or better still digital calipers) and a microfiber cloth. Parts wise you will also need electronics including radio gear, motor, speed controller steering servo, but more on that later.

Before we start our usual disclaimer applies: This isn’t strictly a guide, or even ‘best practice’ for building this chassis and RC Geeks cannot accept responsibility for any issues with your build arising from copying the actions depicted. Please see the included documentation for proper instruction.

The first step is building the gear diff out of the parts in bag one. We were careful to trim down the sprockets with the knife to ensure smooth operation. The metal ball bearings are a welcome addition to the kit and the start of many quality components.


Once the bevel gears are inserted you can top the oil up, add the gasket and screw the lid on. Slide the outer bearings on the drive cups to finish the first stage.
Next up its the rear bulkhead. This is built on-top of the chassis plate found in bag 2. Ensure you use the correct suspension mount as the kit includes more than one.


Setting up the limit set screw the rear lower arms can be complex to line up, but that aside this steps is pretty straight forward.
Building onto the chassis plate, we add the motor mount and a post that will hold the top deck up later on.

Following this the 26 and 40 teeth drive cogs are added after fitting the rear differential.


Note that the diff mounts are ovalised, and need to be rotated correctly to align the gear mesh properly. See the second photo above for a clearer example of this alignment with the dot marker circled.
The steering system is a complicated set of arms and ball joints sat on the narrow nose section of the chassis plate.

Be careful not to tighten down the screws too hard or you can compress the parts together, stopping the bearings from freely rotating the arms and making the steering sloppy and resistant.

The completed unit looks like this when mounted to the deck.
This is a three step process beginning with the lower arms and caster mount.

Note that although the kit comes with a whole set of different camber plate shims, we opted to use the stock bronze-coloured metal ones for the initial build.


With the lower arms built and the lower deck mounting attached, we move onto the upper arms and the damper mounts.

We love the detail of the strengthening plates as they give a scale feel to the looks of the chassis and can of course be seen with the body on. These can then be applied to the front of the chassis.

Lastly we construct the steering hubs and arms, filing the spacers nice and flat (removing the sprig ‘swarf’) helped us get the circle clips on easier later.

The front dampers are pretty basic, filled with the 10000 grade oil the friction tube slides into the damper body before the ball caps are added top and bottom. These then simply pop onto the studs on the rotating damper arms.

Lastly the hubs are fitted in, with plenty of wrestling with c-clips on the ends of the hub pins! This is the front end setup complete.

With the remainder of the earlier bags you have the components for capping the rear diff and adding the rear suspension rotating arms.

Use your ruler or calipers to ensure rear bulkhead tensioner is the right length or it will tug.

Then install it on top with the diff cover and arm swivels.

The rear hubs are are a simple construction but you will need to put together four turnbuckles for this initial step alone.

If your fingers are feeling the burn when putting together the turnbuckles with holes in, start both caps by hand, then use your pliers to hold the adjustment flats whilst levering the open ended caps round with the stem of a hex wrench.

And for the smaller turnbuckles with solid cups, use a cloth in conjunction with your pliers to relieve the pressure.

Insert the bearings into the upright and slide the rear driveshafts into the hubs. Add the ball studs to the underside ready for the turnbuckle links to secure it.

With all four of these completed and the driveshafts fitted to the hubs its time to add them to the chassis. Screw them down on-top before snapping on all the turnbuckle links to the upper and lower points.

Take a second to marvel at the complexity of this design, it really is something!
The anti roll bar is a neat design with minimal components. Slip the mounts over the end, screw them down and snap on the ball caps with the ball studs underneath.


The heat shrink is a nice touch to space the chassis mounts in the groove correctly. The drop links snap into the lower arms to link them together with the spring.
On-to building the large dampers that control the ride at the rear. These are built around a 70mm shaft, threaded at one end.

Fill the damper body with oil and gently compress the piston upwards to remove any air bubbles from the oil. Let this rest a minute and repeat, topping the oil up as the level falls.

Careful to measure the point at which you screw the grub screw in to set the height of the spring perch to ensure both shocks match. Once built you can snap these into place.

With the suspension and drivetrain in place, its time to move onto the aero with the front and rear wing assemblies.

The front wing is built up from a whole host of elements with a strengthening plate underneath the leading edge. Pieced together it looks something like this.

Its not quite as advanced as a proper F1 wing (Especially not compared to ones from the last season) but we love the details with the large endplates and multiple elements. With that mounted onto the front of the bulkhead with an 8mm cap head screw we started work on the rear wing.

Pay attention when building the rear wing as it must be mounted before all the elements are attached. With the rear wing attached you repeat the process of building the anti-roll bar with it then attaching to the chassis, linking the rear arms.

We left fitting the electronics till last so moved onto this stage. Slipping the pins through the driveshaft tips and adding the adaptor means they are ready to accept the wheels.

Note that the car runs a staggered setup with the wider tyres on the rear. When complete you are left with a ‘murdered out’ rolling chassis that looks something like this.

We decided to fit a similar brushless setup to this chassis to the one we fitted 5 years ago. We will also be re-purposing a radio set we already had open however we will be adding a new Savox SC-1251 low-profile servo as required by the kit.
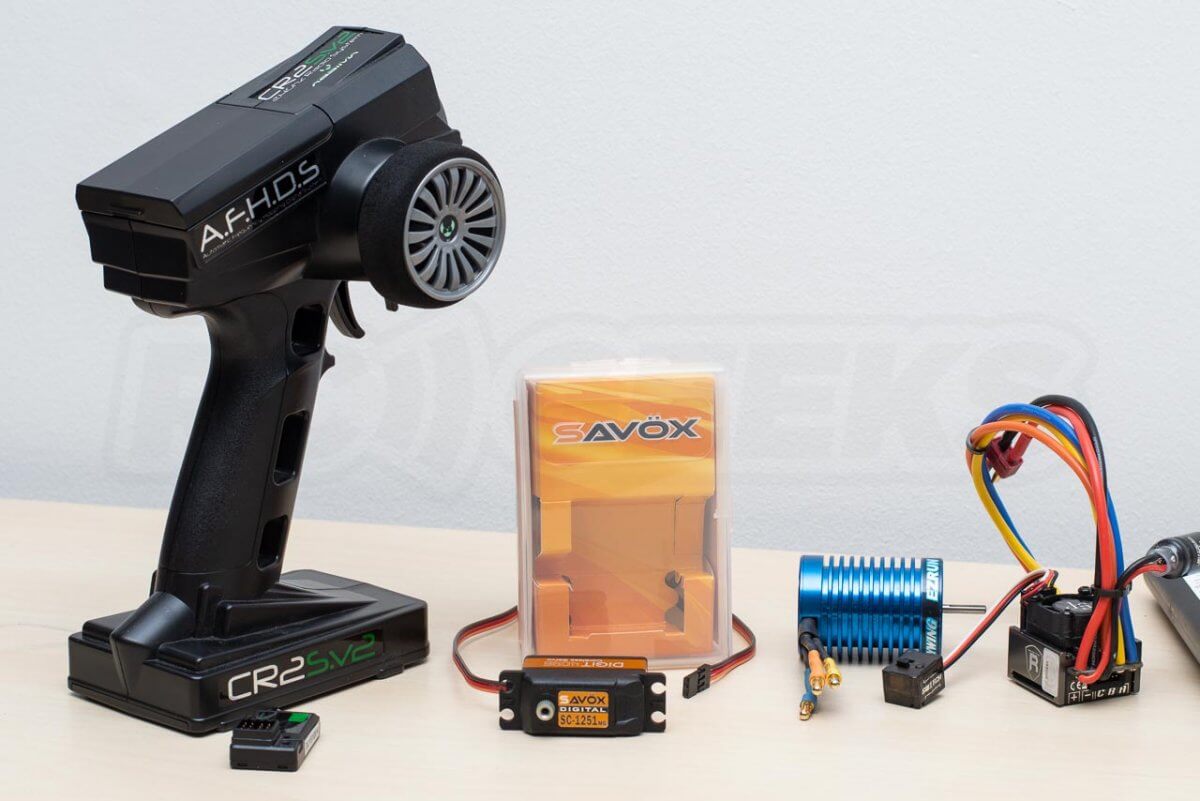
The 3Racing kit features several different servo horns, setup for different servo drive types. When mounted up you can see why the low profile servo is required, narrowly clearing the upper deck, tucked in the position that the right hand radiator would take up in the real car. A rod links the servo back to the steering box at the front with little clearance above it, making battery selection important.


Next up the motor. We opted for a 16T pinion gear fixed to the motor shaft with the included grub screw. The motor is then fitted to the universal mount with two 6mm M3 screws included in the kit. Make sure your pinion gear meshes up with the transmission correctly.


Cramming all the electronics on the small chassis plate is surprisingly challenging. We mounted the antenna post and cut the support tube right down to ensure it cleared the body before running the cable into it. We would recommend selecting your electronics with care, opting for the slimmest radio receiver and speed controller that you can get your hands on. As you can see the items we tried in this first build were not optimal!


The instructions suggest a standard stick pack would fit snugly between the rear bulkhead and the supplied front limiter, however we struggled with the width available, opting to using an FPV drone-sized 1800mAh battery to power it instead.
The body comes pre-finished, painted and trimmed ready to mount. The front mount on ours was pretty poorly cut as a slot rather than a neat hole.

The final bag includes an array of body accessories such as drivers helmet, roof mounted camera, wingmirrors and winglets.

We started by sticker’ing up the drivers helmet and worked around the body adding stickers to make the car look more legitimate. There doesn’t appear to be a clear guide as to what goes where so we based our choices on the box artwork and body curves.

The finished car measures 464mm long with a wheelbase of 280m, 197m wide and weighs around 1.1kg without electronics.


With the body on it really looks fantastic and off we’d argue it looks even better! Rocking the chassis side to side you can really see those dampers do their thing.


We really enjoyed putting this kit together. All told it took a little under 10 hours including fitting the electronics and taking photos along the way.
From here we need to spend some time with the setup sheet finely tuning the chassis to perform as best it can before giving you our thoughts on how it drives!
The 3Racing Sakura FGX2018 kit is available in our store in three varieties. With a pre-painted, pre finished silver and blue body as seen in this article, a kit with a silver/red body and lastly a kit with a clear body that you can paint yourself (for more skilled builders than ourselves!).

When it comes to electronics we’d recommend sourcing the smallest components you can, to maximise space for your battery to fit. We sell two different low-profile Savox servo‘s that would be suitable. Powertrain is trickier as it depends on whetever you wish to go for a brushed or brushless setup. If you need any help picking specific components for this setup, drop us an email via our contact form.
As mentioned we have other F1 content on our blog. Flick through our original 3Racing F113 build from 2014 (!). Read our initial review of HPI Racing’s Formula Q32 mini racing cars, then see how we got addicted to upgrading them, that getting totally out-of-hand culminating in LiPo batteries and FPV feeds!
Want to see more of this F1 car (please say yes so we can convince the boss to let us have a crack at spraying our own body up), or have a suggestion for another F1 car we should review? Drop us a message in the comments section below!
Written by
Tom Begglesworth