Using
FPV goggles with your Phantom or Inspire is currently a hot topic on
Facebook and on forums across the internet. It offers a fantastic new POV, a great way to get a taste for FPV flying if you have never experienced it. In fact with a Phantom 4 in sports mode combined with the high quality of the DJI Lightbridge transmission, in our opinion it can actually rival it! As the downlink technology is adopted by more and more of the product range, it has become easier than ever to get a high quality video feed that you can pipe into all sorts of displays. We look into what goggles are suitable and just how you go about hooking them up to your DJI drone.
FPV Goggles with your Phantom or Inspire - what is supported?
This method works on DJI's Advanced & Professional Phantom 3's with an
add-on, and that same
add-on is needed for the new Phantom 4 (see below for an installation guide). It will however, work out of the box for the Inspire 1. We will be showing the system working on a Phantom 4 although we did successfully test it on our Inspire 1 X5 Pro.

What will I need and can I FPV my Phantom 4?
FPV goggles that support HDMI input. We would recommend the
Fatshark DominatorHD V2 FPV Goggles, or for those on a budget the
Fatshark Dominator V3 FPV Goggles; but other solutions are available. A DJI Drone that includes a HDMI port in its lightbridge-equipped transmitter,for instance the
Inspire 1 X3 or the
Inspire 1 X5 Pro. Some lightbridge powered transmitters can be upgraded by swapping the output module out for the
HDMI output module. These include the
Phantom 3 Advanced,
Phantom 3 Professional or the
Phantom 4. You will also need a HDMI cable with the correct sized plugs, long enough to comfortably connect the two. In our case a suitable one (mini HDMI to mini HDMI) was supplied with the
Fatshark Dominator V3 goggle kit mentioned above.
How to install the HDMI module (DJI Phantom Only)
Skip this part if you are using an Inspire 1 as it is only relevant if you have a Phantom. You will need to install your
DJI Transmitter HDMI Output Module before you can get flying. The following may seem daunting but it is a very simple process.
Note that we cannot take responsibility for any work you carry out on your equipment whilst following these instructions. You will need : 1.5mm allen key/driver, a cross-head screwdriver and a thin plastic lever such as a spudger or small trim removal tool.
- Power down your transmitter and lay it down on its sticks so the back is face up.
- Remove the four 1.5mm hex screws on the back of the transmitter that hold the output module board cover in place.
- Carefully lever the plastic cover from the rear of the transmitter.
- Unscrew the 3 black cross-head screws that secure the board to the transmitter case.
- Using a spudger or trim removal tool, lift the black latches on the sockets to release the three ribbon cables at the edges of the board.
- Gentley push the two small ribbon cables out of their connectors, then lift the top of the board and lift up to slip the bottom ribbon cable out. The old board is now removed from the transmitter.
- Unbox your new HDMI board, remove it from its plastic cover and orientate it with the ports on top of the board and at the top (handle) edge of the transmitter.
- Plug the large ribbon cable into the bottom connector of the board and flip the latch down to lock it in place.
- Plug the smaller ribbon cables into the sides of the board and latch them down.
- Install the new plastic housing over the board, ensuring the ports are carefully aligned before pressing down to locate it.
- Screw the silver screws into the back of the transmitter to hold the plastic housing in place.
- Finally, plug your mobile device into the transmitter, power it up and update the firmware for the transmitter via the DJI Go App.
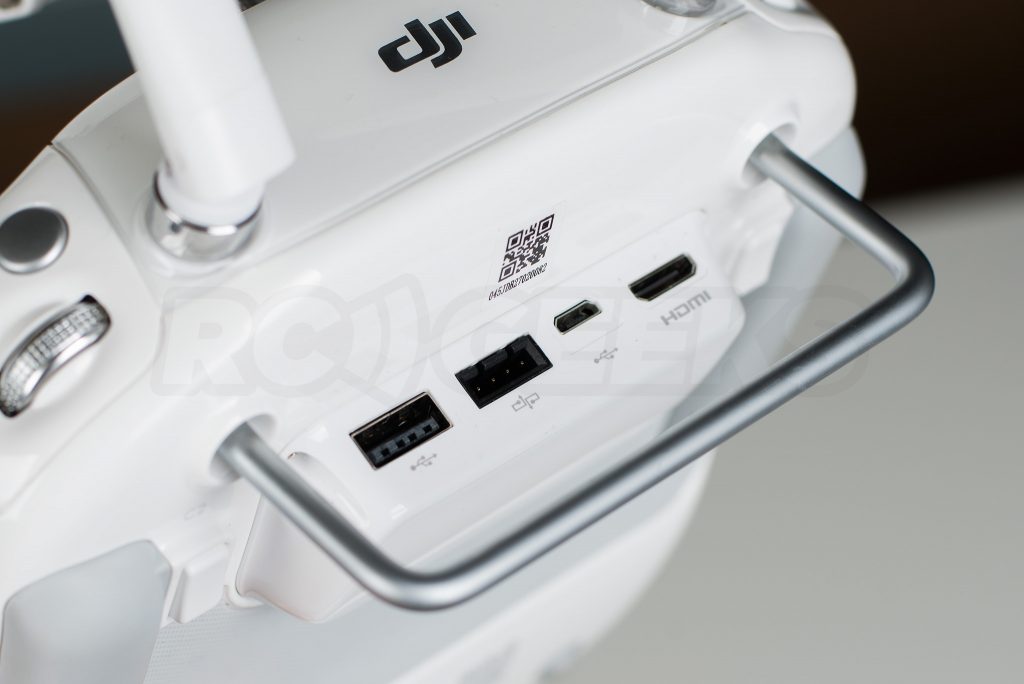
Setting up goggles with your DJI drone
Once your drone transmitter supports HDMI output, setting the system up is a piece of cake. Simply connect your mini HDMI cable into the port on the back of the transmitter.
Then plug the other end of the cable into your goggles. The Dominator V3's have a female HDMI port under the right screen. Many goggles require you enable the HDMI input before it will work, so refer to your manual to check. In our example we had to turn off the internal receiver via the small black switch to the right of the HDMI socket. We fired our goggles up and switched to the '2D HDMI' input.
With the transmitter connected to the craft (and in camera view), access the image transmission settings under the top right menu. From here you can enable 'Simultaneous Image Output to App and HDMI' to mirror the feed. As you can see from the screen capture below, you can also enable 'Display OSD on HDMI Output' which adds an array of useful telemetry data around that outputted image.
FPV goggles in action
The goggles certainly add a new feel to the flying experience. A few of our staff members tried it out, some absolutely loving the experience whilst others were left a touch nauseous!
It was particularly entertaining when the phantom 4 was flying in sport mode, you really get a feel for how quickly the drone can change direction when you are 'sat inside' of it. Obviously with the HDMI output you could feed it to any sort of display. We plugged it into a
Flysight Black Pearl 7" FPV Monitor to give you an idea of what is displayed to the goggles (note the overscan 'overlapping' error is not present when viewed on the goggles). In this example we have the 'Display OSD' setting ticked. For those not familiar with the overlay the information supplied is as follows from left to right.
TOP : Flight mode, Satellite Positioning signal strength, transmitter signal strength, video downlink signal strength, intelligent flight battery level.
BOTTOM : High from home, distance from home, vertical velocity and horizontal velocity. it also includes the direction to the home point (a diamond on the screen) and an attitude line.
How much does it cost?
If you haven't got a HDMI enabled transmitter budget around £90 to upgrade that. To get started we would recommend a set such as the
Dominator HD V3 at around £300. When it comes to goggles and pricing the sky is the limit, but for someone looking for higher resolution image and who is more serious about FPV racing in general, the
Fatshark DominatorHD V2 FPV Goggles with their 800x600 pixel displays are a great purchase at £500.
Is FPV legal?
Its important to note that in the UK, FPV is
effectively illegal as
you must have line of sight to your craft at all times when flying. Thus for domestic use we can really only recommend this for a second operator, a compact way to duplicate the video output to share with friends and family. Interested in more First Person View equipment? See our
online shop here. Have any queries about this setup? Ask a question below!
 EXCELLENT 4.4+ OUT OF 5


 You will need : 1.5mm allen key/driver, a cross-head screwdriver and a thin plastic lever such as a spudger or small trim removal tool.
 Then plug the other end of the cable into your goggles. The Dominator V3's have a female HDMI port under the right screen. Many goggles require you enable the HDMI input before it will work, so refer to your manual to check. In our example we had to turn off the internal receiver via the small black switch to the right of the HDMI socket. We fired our goggles up and switched to the '2D HDMI' input.
  With the transmitter connected to the craft (and in camera view), access the image transmission settings under the top right menu. From here you can enable 'Simultaneous Image Output to App and HDMI' to mirror the feed. As you can see from the screen capture below, you can also enable 'Display OSD on HDMI Output' which adds an array of useful telemetry data around that outputted image.
 It was particularly entertaining when the phantom 4 was flying in sport mode, you really get a feel for how quickly the drone can change direction when you are 'sat inside' of it. Obviously with the HDMI output you could feed it to any sort of display. We plugged it into a Flysight Black Pearl 7" FPV Monitor to give you an idea of what is displayed to the goggles (note the overscan 'overlapping' error is not present when viewed on the goggles). In this example we have the 'Display OSD' setting ticked. For those not familiar with the overlay the information supplied is as follows from left to right. TOP : Flight mode, Satellite Positioning signal strength, transmitter signal strength, video downlink signal strength, intelligent flight battery level. BOTTOM : High from home, distance from home, vertical velocity and horizontal velocity. it also includes the direction to the home point (a diamond on the screen) and an attitude line.
