 EXCELLENT 4.4+ OUT OF 5
Reviews
Funtek Raid Adventure : A low-cost, Land Rover style RC car
Being the first action camera that DJI has released, we were intrigued to see the inner workings of the Osmo Action and how DJI have created this top-selling product to compete with the well established GoPro Hero 7. Let’s get stuck in to see what it’s comprised of and how easy some repairs may or may not be.

Before getting into the nitty gritty, I first removed the UV filter, battery and SD card.

With that out of the way, the obvious starting point seemed to be prying the front cover off of the action camera.


Behind that cover, there's another cover! This time held in place by 5 small crosshead screws.

Using a small amount of force to pry the cover from the rubber waterproof seal in the main frame, the cover comes off but is not fully detached. It has a wide ribbon cable connecting the front screen to the mainboard.

Using a small flat head driver, the ribbon cable easily pops off from the mainboard.

To gain access to the front facing screen, you just need to remove the 4 small cross head screws that hold the backplate in place.


With the backplate removed, you then have access to the multiple layers that make up the screen

Back to the main unit now. The copper heat diffuser is held in place by 3 small cross head screws.

With that removed, the main board is then exposed.


Before we can remove the mainboard, you first had to unplug the 3 remaining ribbon cables, speaker plug and power cable.

Once all the plugs have been disconnected, the mainboard is then free to be removed.


Behind the mainboard is the outer wall of the battery tray.

To remove the battery tray, I used a plastic lever to apply pressure upward from inside of the battery compartment.

With a bit of wiggling and keeping the cables clear, the battery try slides out of the front of the unit.


With the tray out of the way, you can then easily remove the speaker on the side. No screws or adhesive to remove!


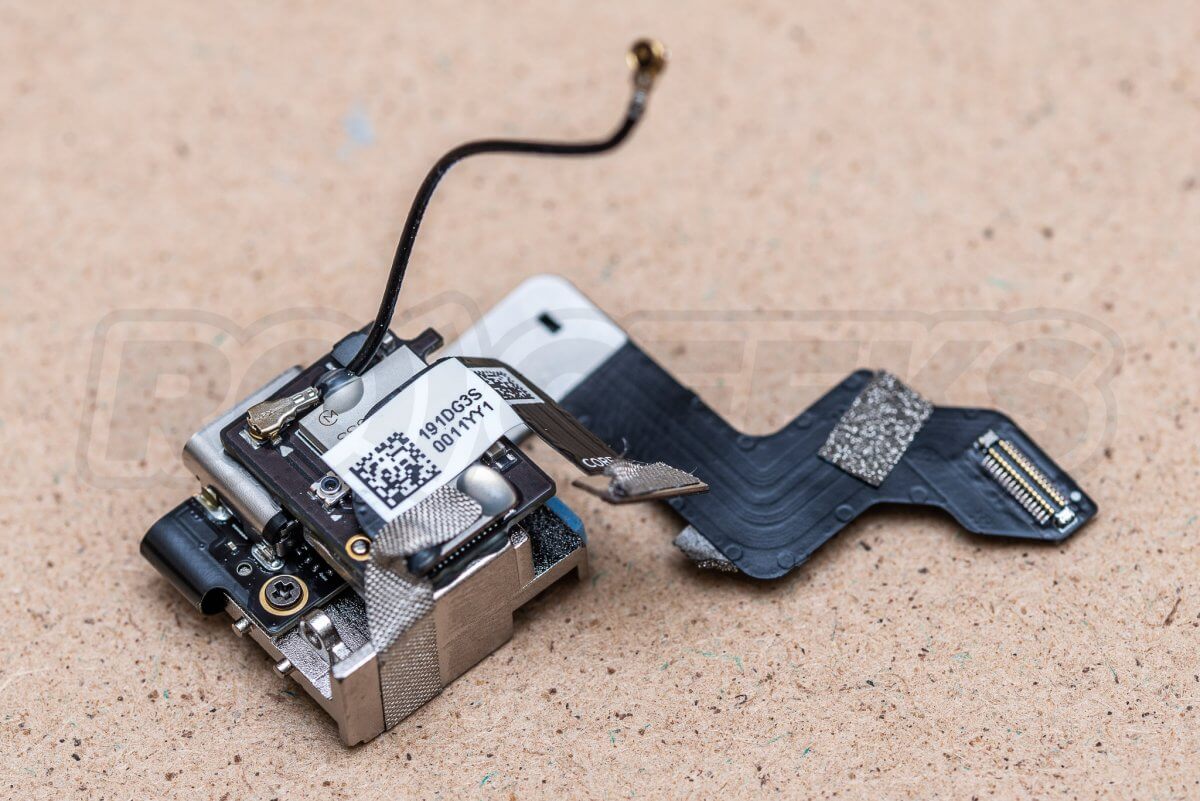
The daughterboard which holds the USB-C slot, micro SD card slot and presumably wifi module, is held in place with just a single cross head screw.


The camera/lens unit is mounted at the base to the mainframe using 3 cross head screws.


With that out of the way, we are almost left with an empty frame.

Now that we have fewer components in the way, we can access the shutter, power and quick switch buttons.

As to how to access the rear screen, that remains a mystery. I tried lifting the thin aluminium plate, pushing the screen from the inside and prying it from the outside but no luck. I even took a heat gun to it in an attempt to soften the plastic or weaken any adhesive but still to no avail.
If you have any success with doing this yourself, please drop us a comment below. I’d be interested to see if it's possible and if so, how!

There’s no denying that DJI have jam packed the Osmo Action with some truly great hardware. Due to the nature of it being a small action camera, it was fiddly at times to dismantle and I wouldn’t recommend a novice to open it up and repair, but in the same breath, it doesn’t take an expert. The small plug and play components make it fairly straight forward to work with, even if you have big hands like me.
The only negative point I’d say about the design of the Osmo Action is that if you manage to smash the lens and are wanting to replace it, you have to replace the whole camera/lens component which requires opening the whole unit up. It would have been nice if you could just unscrew or pop off the lens somehow. I guess you can’t have it all.

If you haven't bought your Osmo Action yet, you can place your order with us today and get free next-working-day delivery! And if you want to get an idea for what to expect once you've placed order, you can check out our Unboxing blog here.
Written by
Phil Harris