After months of waiting, we've finally got our hands on the much awaited
DJI Goggles! We've spent the past week compiling our experiences into the review / guide you see below. In this blog we
unbox the goggles, discuss how to set them up (in terms of fitment and connection) and give our impressions on using them with the
DJI Mavic Pro. We will continue to
update this post as we experiment more with the hardware, thus if you have any questions you would like answered, please leave them in the comments section.
DJI Goggles Unboxing
The Goggles arrive in a black card box with white sleeve cover through which the handle protrudes

With the cover removed you can swing the top of the black insert box open to reveal the display unit.

Lifting that section of the box out reveals the headband, charger, manuals and box of accessories.


The full contents include the Goggle body, Headband, Micro USB cable, HDMI cable, wire clip, cleaning cloth and mains to USB charger as seen below.

A HDMI Type-C adapter and Sling bag are also available from DJI as optional extras.
Constructing, adjusting and wearing the Goggles
The headband slots into the top of the goggle display and it houses the battery. Swing the tab downward and slot it into the display unit. Ensure you have the headband the correct way up, ensuring the tab is on the upper edge. Slot the headband into the slot and ensure it is firmly secured. To release the headband
push down on the plastic button on-top of the display section and pull the headband away.

The completed unit looks like this:

On the rear of the headband is a dial that provides adjustment. Simply rotate the dial to open the headband up and then close it to fit around your head.

The above photo demonstrates the range from minimum to maximum.
Even with my big head (its worth noting I am not modelling the goggles in the featured photos) I was able to attain a comfortable fit thanks to the firm covered foam inside the headband. 
The large screen box and deep rubber light-seal allows the user to wear them over the top of spectacles, a fantastic feature since the focal length of the screen is non-adjustable. The only downside of the ergonomics I found was that for users with larger noses, there is some unavoidable light leakage from around the bottom of the rubber 'seal'. The interpupillary distance range for the goggles is
adjustable between 58 to 70mm. This is adjusted via a dial under the right hand side of the screen box, a natural position for your right thumb.

DJI Have designed the tab on the headband to hinge, this allows you to swing the goggles up and out of your eyes whilst leaving them secured on your head as seen below.

Overall the goggles took some getting used to. I've never used a set of goggles with such a deep 'screen-box' for any period of time and initially the leverage the distance mass puts on your face is unusual. That said with some adjustment to lower the angle at which the band fixed around the rear of my head, I was able to achieve a comfortable balance. Below are a few photos showing how the goggles sit on my colleagues head.

Controlling the goggles
The textured panel on the right hand side of the Mavic Pro is
actually a touchpad.

Place one or two fingers on the touch-pad to operate it. It enables you to scroll through the options menu. Assuming you are right handed, it becomes quite intuitive when the goggles are in place on your head.

Under the right hand side of the goggles are back and function buttons, ideally placed for your thumb to operate whilst swiping. On this panel you can also find a tiny push button, the wireless bind switch for use with the

Alternatively when using a Mavic Pro and the goggles, you can use the C1/C2 buttons and the d-pad on the controller to operate the goggles menu.

Connecting the Goggles to your drone
Via Occusync (wireless connection to Mavic Pro)
When powering up the goggles for the first time you will be ask if you wish to bind/link them to the craft. This is option is also available under the settings menu on the goggles.
Use a paperclip to press the RC link button under the rubber flap on the side of the Mavic Pro (pictured above), then (if required) press the link button on the goggles (found under the function button) with a small implement such as a paperclip.
To other DJI Craft (Phantom/Inspire)
Using a suitably long cable, connect the Micro USB port on the goggles to the USB port on the transmitter.

We will be testing the drone with the Phantom 4, Phantom 4 Adv/Pro and Inspire 2 in depth in an upcoming blog.
Activating your DJI Goggles
When first turning on your Goggles they will request that you activate them either via a mobile device or computer. The easiest way we found to active them was using the DJI Go 4 app
wirelessly via our Mavic Pro. This method assumes you are linking them to an already activated craft, with a smart device logged into your DJI account. The Goggles arrive in a 'ready-to-bind' state and you simply need to put your Mavic Pro into 'bind' mode as detailed above and the app should automatically activate them when it connects. Alternatively if you have a Phantom or Inspire you can activate them through the DJI Assistant 2 software. You need to make sure you are running the latest version (v2.1.1 or newer) which you can find on the
DJI Goggles support download page. Ensure you are signed into your DJI account with DJI Assistant 2 before
connecting them via the USB cable. Follow the onscreen instructions and the goggles should activate after a few seconds.
Goggle Display
The Goggles feature two 1920x1080px displays (one mounted ontop of the display box and bounced down via a mirror) and one mounted at the back) giving a total effective resolution of 3840x1080px. To bring up the quick menu simply slide two fingers downwards on the touchpad. From here you can change into gimbal-specific flight modes such as head-tracking flight, or head-tracking gimbal, or just hide all the UI with fullscreen mode. In standard flight mode the UI is fairly familiar as shown in the diagram below. At the top of the screen you have a similar readout to the DJI Go app. The number of satellites in view, the link to the drone, battery life for the goggles and the battery life for the drone.

There is a boxout for the flight mode and also for the standard telemetry. Along the bottom of the screen are the usual camera readouts with ISO, exposure, shutter speed, aperture and the exposure value. It also states which video mode you are in (more on that later). Along the right hand side you have 3 icons that allow you to change flight mode, options and at the bottom stop and start recording.
Video Modes
Liveview is available with three modes :
-
Smooth Mode : 720p/60 feed that is ideal for FPV flying where you require a fast refresh rate or just want the most liquid-smooth feel to the video.
-
HD Mode : 1080p/30 feed, showing off the fantastic high resolution displays in the goggles and giving you the most detail.
-
Keep Current Mode : Matches the recording mode set on the drone.
When wirelessly connected to the Mavic Pro, DJI say the Goggles have a latency of around 110ms (in 720p). This is slower than you would experience on a dedicated FPV racer which typically would have around 40ms of latency, but is on par with the DJI Go App with a smartphone.
Flight modes with DJI Goggles
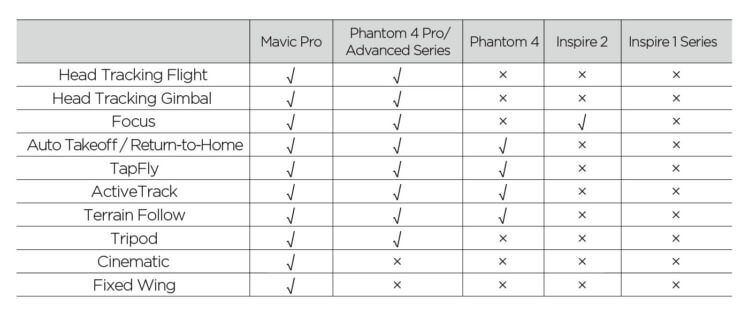
The DJI Mavic Pro has by far the most compatibility with the DJI Goggles so it was the obvious choice for our hands-on test. Together they support head tracking flight, head tracking gimbal, focus control, auto takeoff/return to home, TapFly, ActiveTrack, Terrain Follow, Tripod mode, Cinematic flight and even Fixed Wing flight. After connecting them wirelessly via Occusync, I let Alex operate the goggles whilst I flew the drone.

Head tracking Flight
This was by far my favourite way to use the goggles. Rotate your head and the drone will rotate with you! You can have an assistant push the right stick forward whilst you yaw the drone around in flight by simply turning; Its a fantastic feeling.

Head tracking Gimbal
Head tracking is another mode unique to the the Goggles/Mavic combo. It allows the camera to be moved independently to the drones direction. This allows you to rotate your head up and down to tilt the camera (as you would with the pitch wheel) and also rotate the camera left and right (to the gimbal limits) again with simple head movements. It is such a natural control method that complete amateurs can pick it up right away. The photo below gives you an idea of the angles that are achievable with this system.

Tapfly
In this mode you can move your head to direction, tap the touchscreen to confirm the target before tapping again to start the drone flying towards that point. Many of the other flight modes you are familiar with DJI products are also available to use with the Goggles, but have little difference to using them with a smartphone and app.
Compatibility
The
compatibility of features with the current DJI drones with the DJI Goggles is shown in the table below :
Charging the Goggles
This aforementioned micro-USB port is also used to charge the battery in the headband of the goggles. Connect the USB cable to the goggles and then the included USB power adapter. The charging indicator will go solid red, yellow and green in that order when charging. The battery level indicators on the right hand side of the goggles will light up in sequence showing the progress. The battery will be fully charged
when these lights go out. The headband houses the
9440mAh, 35.44 Wh battery which DJI say will give a maximum operating time of
6 hours. We charged it only once during a whole weeks flying and so would suggest this sounds about right.
Using the HDMI Input
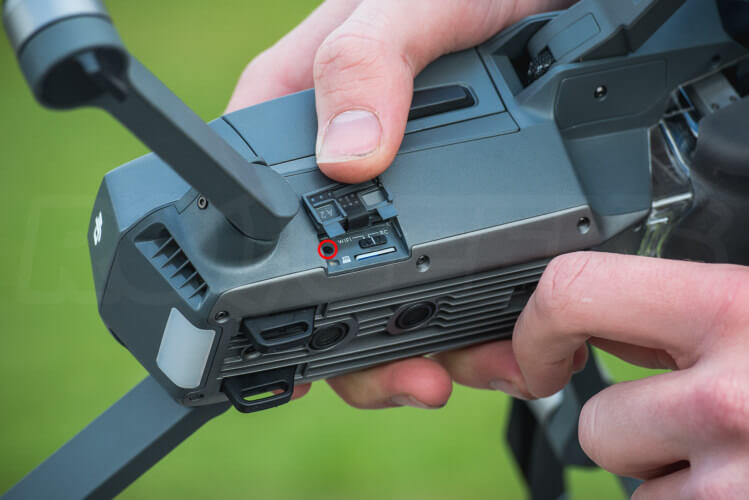
On the left hand side of the goggles (below the heat vent and speaker) is a rubber cover protecting the remaining ports. Behind this you have the SD card slot (for recording what the goggles receive and playing back stored flights) a 3.5mm Audio jack and the Type-D HDMI port.

You can connect the included HDMI lead to this port, run it alongside the headband and through the included cable clip, before connecting it to another device. Switching the goggles to Tools > HDMI Input will allow you to use the goggles as a display for your computer, Blu-ray player or other device with a standard HDMI output. One of my colleagues used the goggles extensively with their computer, testing them for
film and also
gaming use. His findings suggested that whilst they were fine for watching films, if you aren't used to being sat close to a large screen for gaming, they are perhaps not ideal. They require you to hunt your eyes around the effectively large screen area.
Always fly safely
Whilst I am not qualified to give legal advice (and this should not be considered as such) its worth remembering that in the UK you are required to fly your drone by line-of-sight; Thus the goggles should only be used when paired with a co-pilot. You can learn more about drone flight restrictions in the UK
on the CAA website, or on their
drone code site.
DJI Goggles - In Conclusion
It
has been a long wait but the Goggles have proved to be worth it, we are
big fans of the system as a whole. It appears expensive but to emulate elements of the feature set (for example head tracking) with say, a FatShark system would easily cost the same but would lack the accessibility. The huge field of view is like nothing we have experienced (in terms of FPV) before. The head tracking is smooth and accurate, offering a really natural intuitive camera operation. If you have the budget for it, two pairs of goggles can be connected to the same drone. The wireless connection to the Mavic Pro is a killer feature, offering fantastic freedom.

That said, there
are some downsides. The lack of wireless support for any other drone but the Mavic Pro is a downside. This ontop of the limited Inspire 2 support (where it would make a fantastic tool for camera operators) seems like a missed opportunity. We hope that a future firmware update might enable this, but DJI have said nothing of yet. Eitherway with the interest we have seen in the Goggles, the forthcoming Phantom 5 and (assumed) Mavic Pro 2 will surely be Occusync compliant right out of the box. The size and weight of the goggles takes some getting used to, especially if you are used to lightweight slimline FatShark goggles with anti fog lenses and cooling fans. Also some users are reporting issues with the lack of focal length adjustment, requiring them to use reading glasses when using the goggles. Also considering the price, it would be nice to see a properly designed DJI carry case for the Goggles. Dismantling them to use the included box becomes a pain requiring you to disconnect the headband each time you pack them away.

Order you DJI Goggles today
The DJI goggles are
available through our webstore and we intend to stock the official accessories shortly too. With initial interest very high and stock limited, we suggest you place your order as soon as possible to avoid disappointment!
 EXCELLENT 4.4+ OUT OF 5